Trying to take clear photos at night or indoors can feel impossible. One moment everyone’s smiling, and the next, your image looks dim, blurry, or full of grainy noise.
ISO is the camera setting that controls how sensitive your sensor is to light. When you understand ISO, you can brighten shots without accidentally adding as much blur or noise as you fear.
ISO also works alongside aperture and shutter speed in the exposure triangle. Once you see how those three settings interact, your photos start to look sharper in tough lighting.
Let’s break down what ISO is, what changes when you raise or lower it, and how to pick better settings fast.
What ISO Really Means for Your Camera Shots
ISO tells your camera how strongly to “notice” light. Think of your eyes adjusting in a dark room. At first, things look too dim. Then, your pupils open wider. Things start to appear, but not always with perfect clarity.
On a camera, higher ISO values make the sensor more sensitive. That means you can expose a photo with less light. As a result, your image gets brighter, even if the scene stays the same.
However, there’s a trade-off. When you push ISO higher, you can also create more noise. Noise looks like grain, specks, or a muddy texture. It won’t look the same on every camera, but the risk rises as ISO goes up.
If you want a simple mental model, imagine each ISO step as a brightness knob. Many cameras use standard steps like 100, 200, 400, 800, 1600, 3200. Each step usually doubles the sensitivity, so the exposure changes in a predictable way.
For a beginner-friendly explanation of ISO and why the “low ISO is best” advice isn’t always practical, see What Is ISO in Photography? The Beginner’s Full Guide.
Also, ISO is often the easiest setting to change when you’re stuck. You can raise ISO to rescue an underexposed photo. You can also lower it when you have enough light.
That matters because beginners often face two common problems:
- Shots look too dark, even when focus is correct.
- Shots blur because they rely on slow shutter speeds to gather light.
ISO helps with both, as long as you watch the noise.
How ISO Fits into the Exposure Triangle
ISO is only one piece of the puzzle. To control photo brightness, you’ll use the exposure triangle:
- ISO (sensor sensitivity)
- Aperture (lens opening size)
- Shutter speed (how long light hits the sensor)
Together, they decide how bright the image becomes. They also affect image style and sharpness. For a clear refresher on how the triangle works, check out The Exposure Triangle Explained: ISO, Shutter Speed, and Aperture.
Here’s the key idea. If one setting gives you more light, another might need to give back some trade-offs.
For example:
- Low ISO usually gives cleaner photos.
- But low ISO can force you into slower shutters or wider apertures.
- Slow shutters can blur moving subjects.
- Wide apertures can blur the background in ways you might not want (or sometimes keep it too soft).
On the other hand, high ISO brightens the image fast. It often helps you use a faster shutter, which keeps action sharp. Yet, it can add grain and reduce fine detail.
So the goal isn’t “always use the lowest ISO.” The goal is to get the right exposure with the sharpness and look you want.
If your shutter speed is too slow and your subject moves, ISO may save the shot.
Most beginners do best by starting with low ISO, then adjusting the other two settings as needed. When you can’t get enough light without blur, that’s when raising ISO becomes a smart move.
Quick Guide to Aperture and Shutter Speed Pairings
Use ISO like a teammate, not a lone hero. When light drops, you often need to move two things at once: brightness (ISO) and motion control (shutter speed).
In bright sun, try to keep things simple:
- Bright sun often works with ISO 100, f/16, and around 1/1000s.
- That combo keeps images crisp and reduces noise.
For indoor portraits and casual gatherings:
- Start with ISO 400 to 800, a wider aperture like f/2.8, and a shutter near 1/60s.
- If people move a lot, push shutter speed higher, then raise ISO as needed.
For darker scenes and events where motion happens:
- Use a faster shutter like 1/125s (or faster for sports).
- Then choose a higher ISO such as 800 to 3200, depending on your camera and room lighting.
On hikes at dusk, it’s common to end up with wider apertures and moderate ISO. In other words, you’re balancing depth-of-field and sharpness together.
The Impact of ISO on Your Photo Quality
Here’s what ISO usually changes first: the appearance of noise.
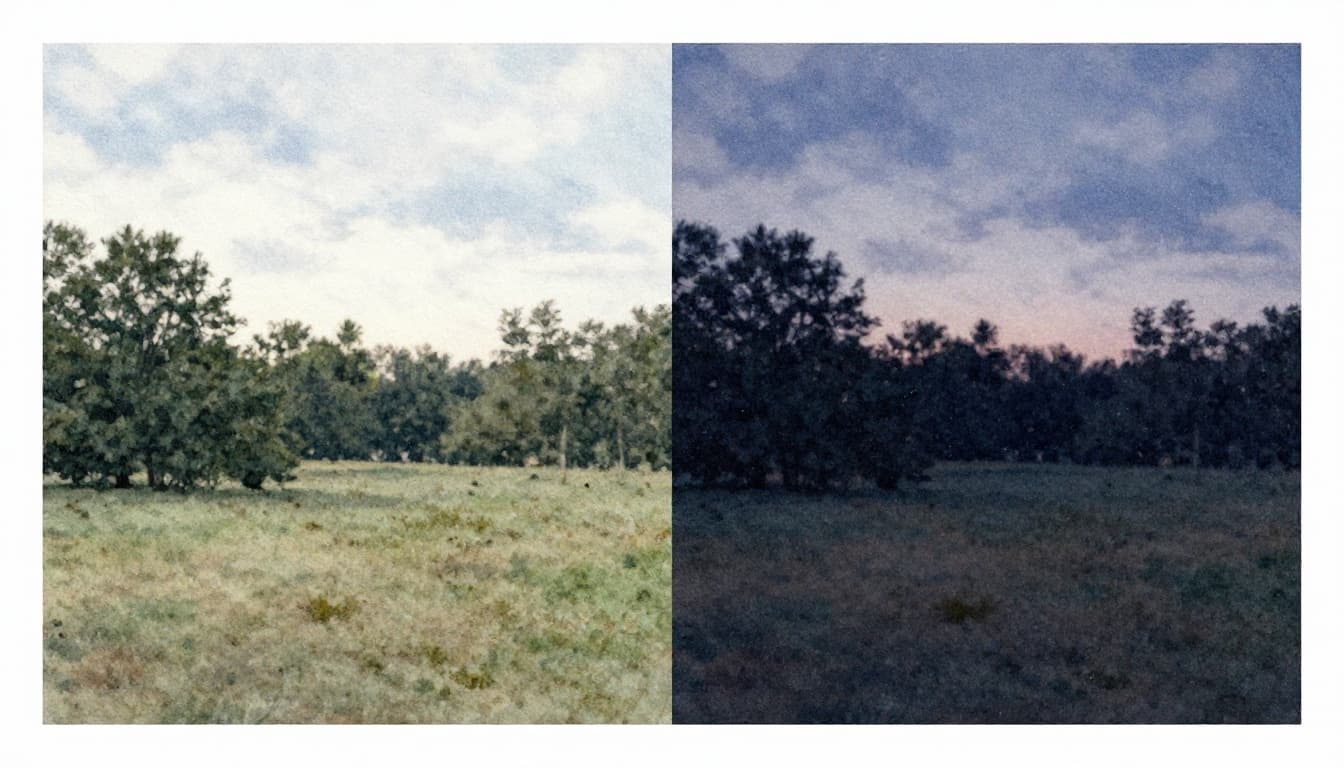
When you shoot at low ISO (often 100 to 400), images tend to look cleaner. Shadow areas look smoother. Colors stay steadier. Details like fabric texture or hair strands show up with more clarity.
When you raise ISO into 1600+, you’re often trading detail for brightness. Your image can look lighter, but small details might soften. You may also see noise in dark areas, like under eyes, in corners, or across night skies.
Modern cameras handle high ISO better than older models. Some newer sensors show improved low-light performance, which can reduce noise for the same ISO level. Recent sensor announcements for 2026 also point to better low-light results through updated pixel designs and processing. Still, the basic physics stays the same: more sensitivity can mean more noise.
Also, noise isn’t just “one thing.” It often looks like:
- grainy dots (luminance noise)
- color specks (chrominance noise)
A good way to think about it is this: raising ISO amplifies the signal. That can bring up both real detail and unwanted random variation.
So if you plan to print, many photographers try to keep ISO closer to the base range. If you only share online, slightly higher ISO can be fine, especially with good exposure.
If you want to understand how high ISO noise gets reduced (including AI-based denoise tools), see AI Noise Reduction: How It Works and When to Use It.
Spotting and Minimizing Noise in High ISO Shots
Noise usually shows up in the parts of a photo you least want to degrade. So check:
- shadows and dark corners
- smooth skies
- solid walls and backgrounds
Then zoom in. On a phone or camera screen, noise can hide at first. When you zoom, it becomes obvious.
To minimize noise without losing your moment:
- Shoot RAW if your camera supports it. RAW files give you more flexibility to clean noise during editing.
- Lower ISO when you can by changing shutter speed and support.
- Use a tripod (or rest your camera on something solid) when the subject isn’t moving.
- Improve your odds with better light, like standing near windows or adding a lamp.
Also, don’t forget that noise reduction can soften details. So use it carefully. Try a small adjustment first, then check textures like hair, eyelashes, and signage edges.
If you want one “pro” habit, it’s this: test, then choose. Take a few shots at different ISO values. Compare them on the same device. You’ll learn your camera’s comfort zone faster than any chart.
Best ISO Settings for Common Shooting Scenarios
ISO settings depend on your light, your subject, and how much motion you can tolerate. Still, you can use a practical cheat sheet.
Here’s a simple starting point for most cameras:
- ISO 100: bright sun, clean landscapes, daylight portraits with strong light
- ISO 200–400: cloudy days, shade, early morning light
- ISO 800–1600: indoors, restaurants, dim rooms, evening events
- ISO 3200+: night scenes, concerts, sports under poor lighting (often with noise)
If your camera offers Auto ISO, use it when you need speed. That’s common for sports, kids at events, or travel days. Just consider setting a cap, so Auto ISO won’t jump too high.
For indoor shooting habits, including how ISO changes with aperture and shutter speed, you can also reference Camera Settings for Indoor Photography: The Complete Guide.
The trick is to raise ISO only when it solves a real problem. If your shutter speed already freezes motion, you may not need to push ISO higher.
From Sunny Outdoors to Dim Indoor Events
Outside, the light often does half the work. On a beach day, you can keep ISO low and let shutter speed handle crisp waves and faces. As the sun drops, you’ll feel the difference quickly.
For portraits in good light:
- ISO 100 to 200 can keep skin tones smooth.
- A wider aperture like f/2.8 helps separate the subject from the background.
For sports indoors:
- Expect ISO 800+ more often than not.
- Set your shutter speed first, then raise ISO to match exposure.
For astrophotography on a tripod:
- ISO 3200 can be a common starting point.
- The tripod matters because it lets shutter speed stay long without blur.
- If you increase ISO, keep an eye on noise color and speckling.
If you use a crop-sensor camera, you might see noise sooner at the same ISO number. Full-frame sensors often give cleaner results in low light. Still, the exposure triangle idea stays the same for both.
Practical Tips to Control ISO Like a Pro
Want a simple plan for better ISO choices? Start with the light you have, not the settings you wish you had.
First, aim for the lowest ISO that still gets you the shutter speed you need. That single rule prevents most beginner noise problems.
Next, control your “risk.” Auto ISO can be helpful, but it can also surprise you. If you can, set an Auto ISO max so your camera doesn’t crank ISO too far in darker moments.
Then, shoot RAW when you can. RAW files make noise cleanup more flexible. If you shoot JPEG, you can still reduce noise, but you’ll have fewer options.
Also, keep your gear ready:
- A clean lens and clean sensor help overall image quality.
- A clear lens lets more light through.
- A steadier camera lets you use lower ISO.
Finally, practice on purpose. Try a night scene at ISO 800, 1600, and 3200. Compare images in the same lighting. After a few tests, you’ll stop guessing.
If you want a deeper beginner overview of how ISO choices affect exposure and quality, review What Is ISO in Photography? The Beginner’s Full Guide.

Here are a few tight moves you can try tonight:
- Use the exposure triangle first (shutter speed for motion, aperture for look, ISO to fill the gap).
- Cap Auto ISO when you want consistent results.
- Zoom in after shooting to check shadow noise.
- Stabilize your camera when your subject stays still.
The best ISO isn’t the lowest one. It’s the one that keeps your photo sharp.
When you build this habit, your pictures start to feel predictable. And that confidence shows in every family gathering shot and night walk photo.
Conclusion
ISO makes your camera more sensitive to light, so you can brighten dim scenes. When you raise ISO, you also raise the chance of noise, which can soften details. That’s why the exposure triangle matters, ISO, aperture, and shutter speed working together.
Next time your photo looks too dark, don’t panic. Start with what motion needs, then adjust ISO to get a clean exposure you can actually use.
Grab your camera and run a quick test tonight. Then share what ISO you used, and where noise showed up for you.